
こんにちは!ガジュマル育ててる人です。
シリーズではないですが、CloudWatch Synthetics Canaryを触った記事あるので、
もしよければ、ご覧ください!
・前々回の記事
・前回の記事
Synthetics Canaryで画面キャプチャの差分が取れるとのことなので、
今回はそれを設定してみたいと思います!
目次
設定方法
例:https://blog.future.ad.jp/のスクリーンショットの差分を取る場合、下記のような手順で実行します。
CloudWatch > アプリケーションのモニタリング > Synthetics Canaries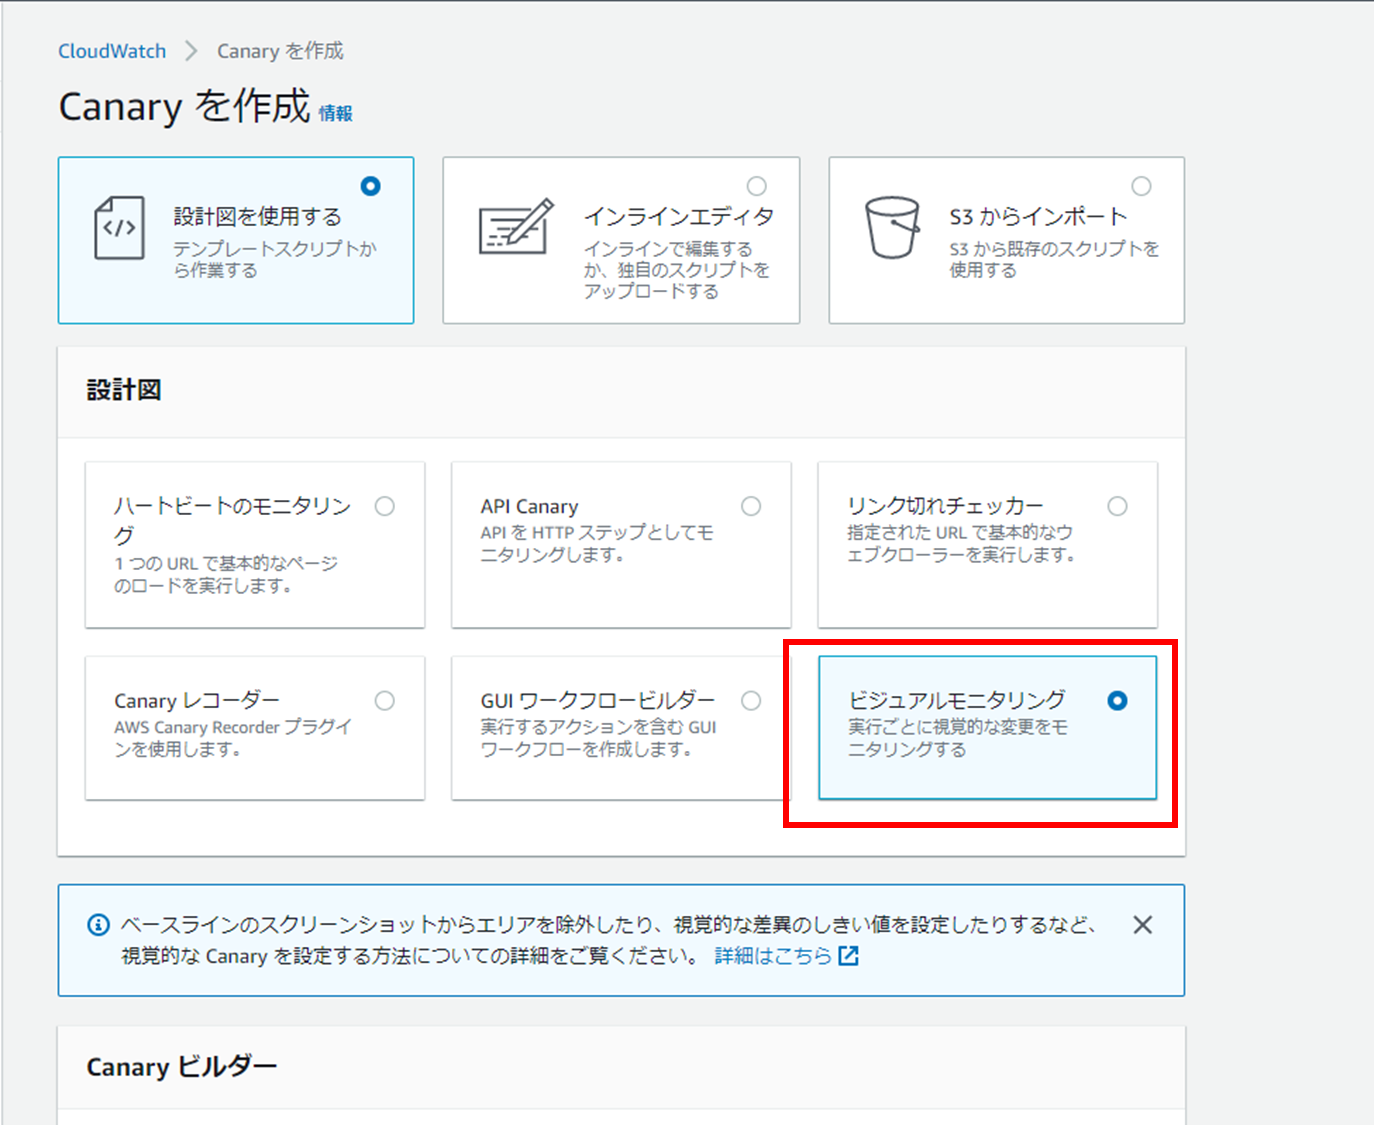
・ビジュアルモニタリングを選択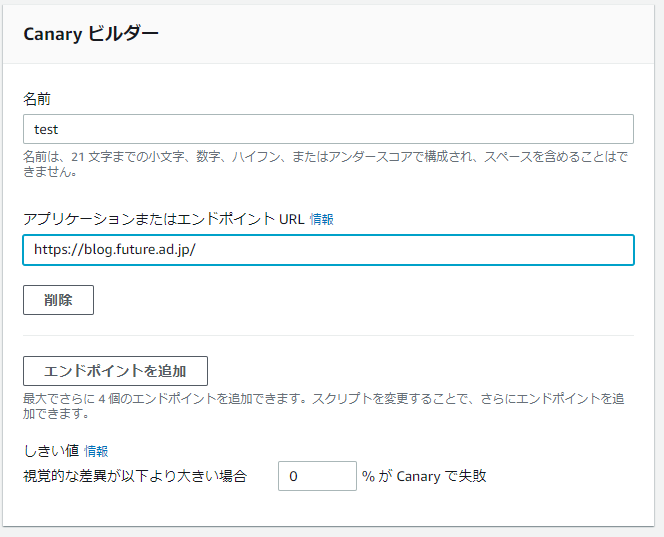
名前とURLを入力します。
視覚的な差異が以下より大きい場合の項目で
取得したスクリーンショット同士でどのくらい差分があるとアラートとみなすかを決められるみたいです。
今回は0%にして少しでも差分があるとエラーになる設定にしてみました。
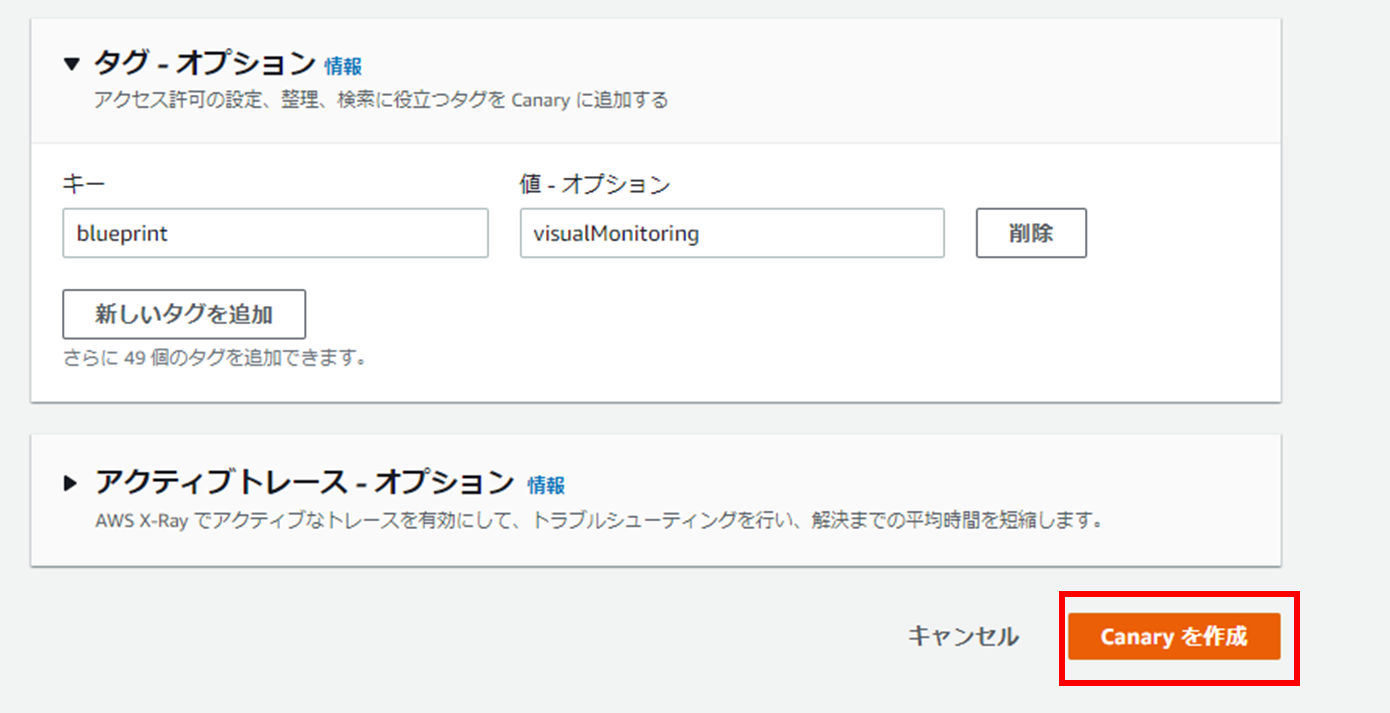
あとはcanaryを作成をクリックでできます!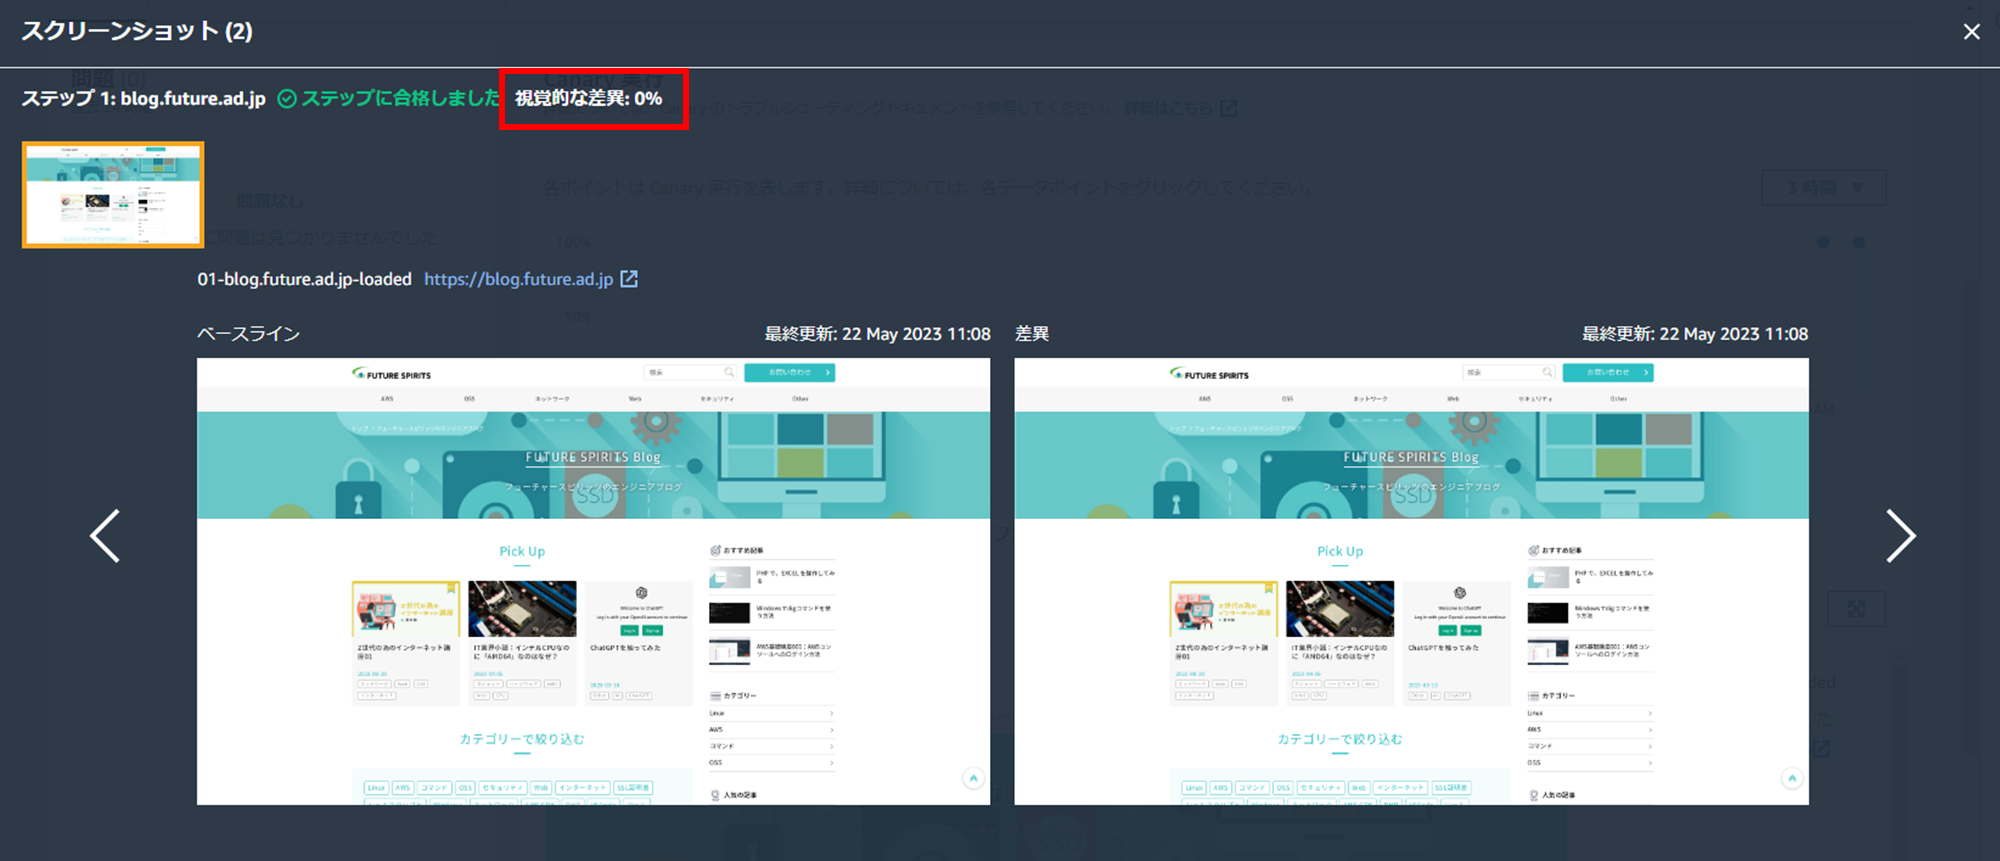
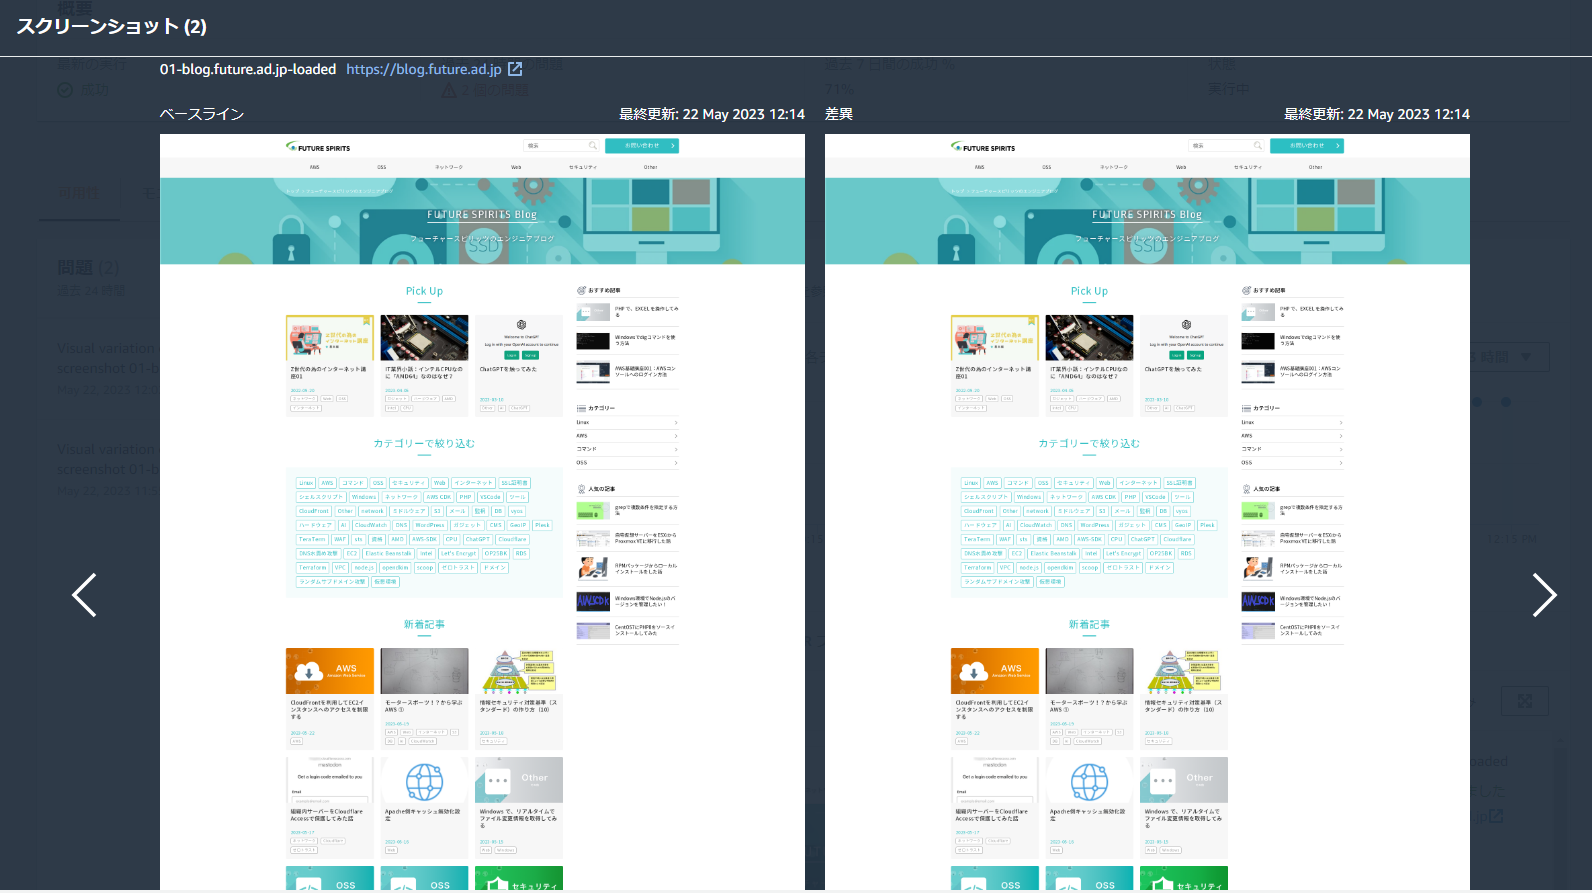
するとこのようにスクリーンショットの差分を確認することができます。
やっぱりページサイズが狭い
デフォルトだとやはり、ページサイズが多分1980×1080?のPCの画面とほぼ同じ範囲しか取得できないようですね。
前回の記事と同様に全画面のスクリーンショットを撮ってみようと思います。
記事作成時点での2023年5月22日ではスクリーンショットの差分をとるのはnode.jsしか対応していないようで、前回のpythonはつかえないので、新しく考え直す必要がありそうです。
いろいろと試行錯誤の結果
101行目あたりの[await synthetics.takeScreenshot(stepName, 'loaded');]の上に以下3行を追加することで取得できそうです。
        const pageHeight = await page.evaluate(() => document.body.scrollHeight);
        const pageWidth = await page.evaluate(() => document.body.scrollWidth);
        await page.setViewport({ width: pageWidth, height: pageHeight });
無事全画面のキャプチャをとることができましたね!
ちなみにCloudwatchのユーザーガイドによると
差分があった際にハイライトを表示できるようなので、下記をスクリプトの一番下に挿入してみます。
syntheticsConfiguration.withVisualVarianceHighlightHexColor("#fafa00")
#fafa00は16進数の色コードなので、お好きな色にしてみてください。
あえてキャプチャする画面サイズを変更して、スクリーンショットの差分が発生するようにしてみるとこんな感じでした。
個人差はあると思いますが、少し視認性がよくないので色は調整したほうがいいかもしれません。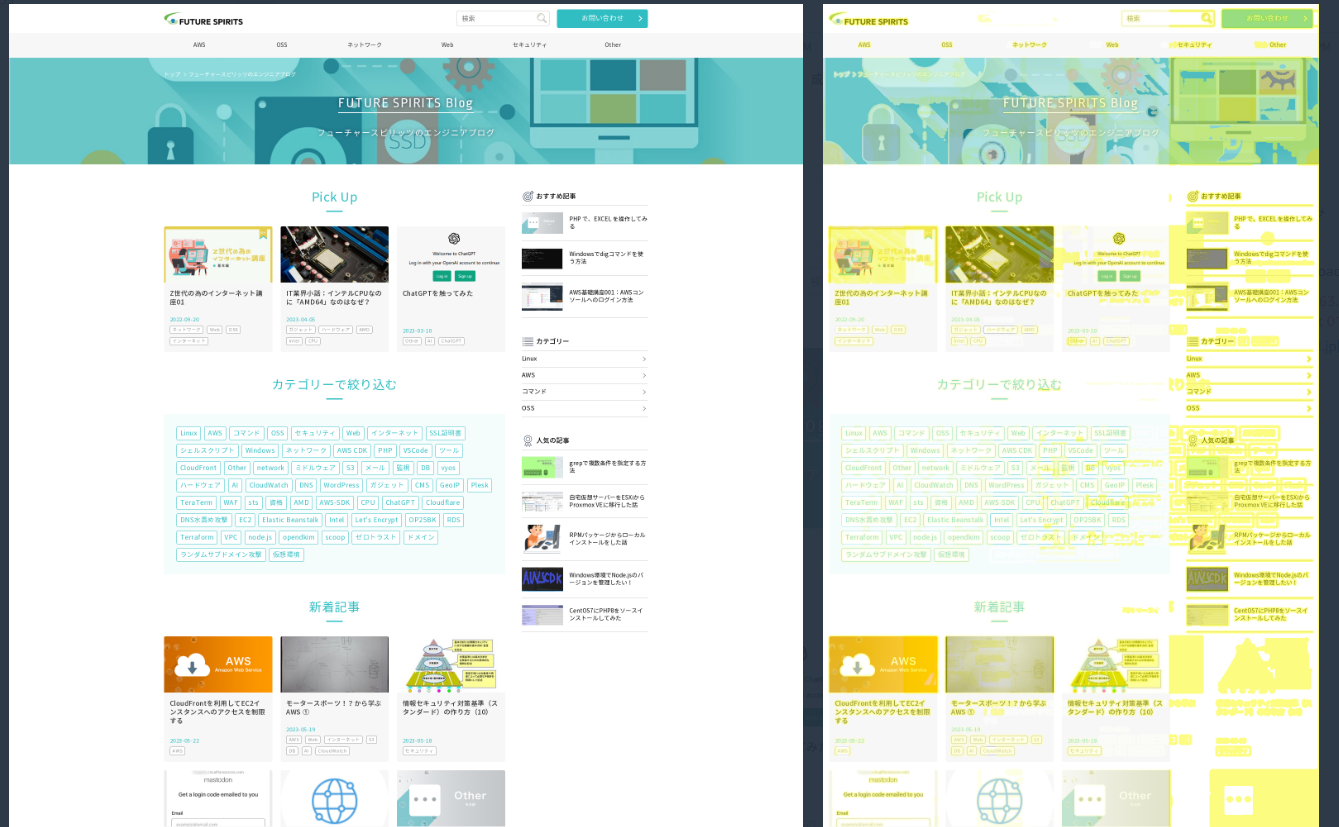
最終的なスクリプト
最終的なCanary スクリプトも載せておきます!
下記3点の要素を変更すればいろいろなサイトにて使用可能かと思います!
const urls = ['https://blog.future.ad.jp/'];
39行目視覚差分のパーセンテージの変更
116行目ハイライト表示の色設定
const URL = require('url');
const synthetics = require('Synthetics');
const log = require('SyntheticsLogger');
const syntheticsConfiguration = synthetics.getConfiguration();

const loadBlueprint = async function () {

    const urls = ['https://blog.future.ad.jp/'];

    /* Disabling default step screen shots taken during Synthetics.executeStep() calls
    Step will be used to publish metrics on time taken to load dom content but
    Screenshots will be taken outside the executeStep to allow for page to completely load with domcontentloaded
    You can change it to load, networkidle0, networkidle2 depending on what works best for you.
    */
    syntheticsConfiguration.disableStepScreenshots();
    syntheticsConfiguration.setConfig({
       continueOnStepFailure: true,
       includeRequestHeaders: true, // Enable if headers should be displayed in HAR
       includeResponseHeaders: true, // Enable if headers should be displayed in HAR
       restrictedHeaders: [], // Value of these headers will be redacted from logs and reports
       restrictedUrlParameters: [] // Values of these url parameters will be redacted from logs and reports

    });

    /* Enable visual testing on a screenshot taken using the method takeScreenshot
    Screenshots taken in the current test run will be compared against screenshots taken in the base test run
    When a new canary is created, the first successful run will be chosen as the base test run
    A test run can be made a base run by passing it's baseTestRunId in the updateCanary API or using the Synthetics AWS console
    You can opt-in or opt-out a screenshot on which visual testing operation will be performed using the updateCanary API or the Synthetics AWS console
    */
    syntheticsConfiguration.withVisualCompareWithBaseRun(true);


    /* By default, when there is a difference between the base and current screenshot, the canary fails.
    You can configure the variance threshold percentage below which the canary won't fail using the withVisualVarianceThresholdPercentage method
    You can draw an area/boundary on the base screenshot which will be ignored during visual testing operation.
    You can draw ignore boundaries and export the coordinates to other clients like CloudFormation or SDK using the Synthetics AWS console. The boundary coordinates can also be exported us
    */
    syntheticsConfiguration.withVisualVarianceThresholdPercentage(0);

    let page = await synthetics.getPage();

    for (const url of urls) {
        await loadUrl(page, url);
    }
};

// Reset the page in-between
const resetPage = async function(page) {
    try {
        await page.goto('about:blank',{waitUntil: ['load', 'networkidle0'], timeout: 30000} );
    } catch (e) {
        synthetics.addExecutionError('Unable to open a blank page. ', e);
    }
}

const loadUrl = async function (page, url) {
    let stepName = null;
    let domcontentloaded = false;
    try {
        stepName = URL.parse(url).hostname;
    } catch (e) {
        const errorString = `Error parsing url: ${url}. ${e}`;
        log.error(errorString);
        /* If we fail to parse the URL, don't emit a metric with a stepName based on it.
           It may not be a legal CloudWatch metric dimension name and we may not have an alarms
           setup on the malformed URL stepName.  Instead, fail this step which will
           show up in the logs and will fail the overall canary and alarm on the overall canary
           success rate.
        */
        throw e;
    }

    await synthetics.executeStep(stepName, async function () {

        /* You can customize the wait condition here. For instance, using 'networkidle2' or 'networkidle0' to load page completely.
           networkidle0: Navigation is successful when the page has had no network requests for half a second. This might never happen if page is constantly loading multiple resources.
           networkidle2: Navigation is successful when the page has no more then 2 network requests for half a second.
           domcontentloaded: It's fired as soon as the page DOM has been loaded, without waiting for resources to finish loading. Can be used and then add explicit await page.waitFor(timeInMs)
        */
        const response = await page.goto(url, { waitUntil: ['domcontentloaded'], timeout: 30000});
        if (response) {
            domcontentloaded = true;
            const status = response.status();
            const statusText = response.statusText();

            const logResponseString = `Response from url: ${url}  Status: ${status}  Status Text: ${statusText}`;

            //If the response status code is not a 2xx success code
            if (response.status() < 200 || response.status() > 299) {
                throw new Error(`Failed to load url: ${url} ${response.status()} ${response.statusText()}`);
            }
        } else {
            const logNoResponseString = `No response returned for url: ${url}`;
            log.error(logNoResponseString);
            throw new Error(logNoResponseString);
        }
        // Wait for 3 seconds to let page load fully before taking the screenshot on which visual testing will be performed.
        await page.waitFor(3000);

        const pageHeight = await page.evaluate(() => document.body.scrollHeight);
        const pageWidth = await page.evaluate(() => document.body.scrollWidth);
        await page.setViewport({ width: pageWidth, height: pageHeight });

        await synthetics.takeScreenshot(stepName, 'loaded');
    });

};

const urls = [];

exports.handler = async () => {
    return await loadBlueprint();
};

syntheticsConfiguration.withVisualVarianceHighlightHexColor("#fafa00")
まとめ
3回にわたってSynthetics Canaryについて書いてきましたが、
やはり少し直すだけでめちゃくちゃ使い勝手がよくなるサービスだとおもいました。
従量課金制ではありますが、AWSの公式ページによると
2023年5月22日時点で無料枠が100回/月で、東京リージョンであれば1回実行あたり0.0019USDです。
1日3回程度であれば無料枠にも収まりますし、10分に1回なら
(60/10)*24*31*0.0019 ≒ 8.4USDくらいに収まります。
厳密にはキャプチャを取得するのでS3の保存料を考える必要はありますが、S3の保存料は東京リージョンで0.025USD/GB(2023年5月22日時点)なので、
1回数MBと考えても1ヵ月程度保存であれば料金が跳ね上がることなさそうです。
※回数によりますので、ご自身のS3で取得したキャプチャの容量を確認してみてください。
それではまたお会いしましょう!さよなら!
